 Pin it
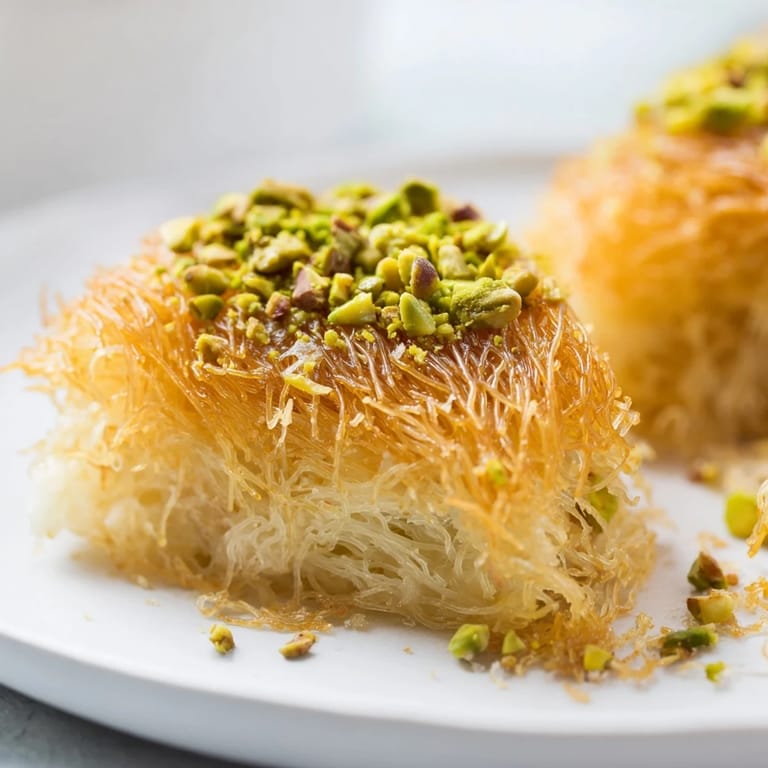
 The first time I attempted knafeh, I stood in my tiny kitchen with golden strands of kataifi draped across my counter like edible straw, unsure if I was about to create magic or a crispy disaster. My neighbor had brought over a warm wedge from a local bakery the week before, and one bite of that stretchy cheese center meeting the caramelized phyllo had me hooked—I knew I had to figure out how to make it at home. The scent of orange blossom and honey syrup still lingers in my memory from that first successful batch, filling my whole apartment with the warmth of something genuinely special.
I'll never forget the first time I served this to my friend Layla, who grew up eating knafeh at family celebrations in Beirut. She took one bite, closed her eyes, and told me it reminded her of her grandmother's version—and honestly, that compliment meant more to me than any perfect plating ever could.
Ingredients
- Akawi cheese: This is the heart of knafeh and its mild, slightly salty character is what makes it stretch so beautifully when melted; soaking it removes excess salt so the cheese doesn't overwhelm the delicate syrup.
- Ricotta cheese: It lightens the filling and adds a creamy texture that keeps the cheese mixture from being too heavy or dense.
- Kataifi (shredded phyllo dough): Those golden strands create the signature crispy exterior when baked, and they soak up butter to become irresistibly crunchy.
- Unsalted butter, melted: This is what makes the kataifi strands golden and crunchy; using unsalted gives you control over salt levels since your cheese is already contributing to the flavor.
- Granulated sugar: The foundation of the syrup that will soak into the warm knafeh right after it comes out of the oven.
- Water and lemon juice: Together they balance the sweetness and prevent the syrup from tasting one-dimensional or cloying.
- Orange blossom and rose water: These are the secret handshake of Middle Eastern desserts; they transform simple syrup into something floral, delicate, and unmistakably knafeh.
- Pistachios: The garnish adds a pop of color and a subtle nuttiness that echoes through the whole dish.
Tired of Takeout? 🥡
Get 10 meals you can make faster than delivery arrives. Seriously.
One email. No spam. Unsubscribe anytime.
Instructions
- Soak and prepare your cheese:
- If you're using Akawi, start this the day before or several hours ahead—soak it in cold water and change the water frequently to draw out the excess salt. Once drained and patted dry, shred or slice it thinly so it melts evenly.
- Mix your cheese filling:
- Combine your prepared Akawi with ricotta in a bowl, stirring gently until they're loosely combined. You want them to hold together but still have a soft, creamy texture.
- Butter and separate the kataifi:
- Spread the thawed kataifi strands in a large bowl and gently pull them apart with your fingers so they're not clumped together. Pour the melted butter over them and toss carefully until every strand is coated—this is what creates that golden crispness.
- Layer the bottom:
- Grease your 23 cm round baking dish and spread half of the buttered kataifi evenly across the bottom, pressing down gently to form a solid base. You want it compact enough to hold the cheese but not so tight that it becomes dense.
- Spread the cheese:
- Distribute your cheese mixture evenly over the kataifi base, leaving just a tiny margin at the edges. This is where the magic happens—warm cheese meeting crispy pastry.
- Top and press:
- Cover the cheese with the remaining buttered kataifi, gently pressing down so the layers hold together as the knafeh bakes. The top should look golden and inviting before it even hits the oven.
- Bake until golden:
- Into a preheated 180°C oven it goes for 30 to 35 minutes, watching until the top turns a deep golden brown. Your kitchen will smell incredible—that's your signal it's almost ready.
- Make the syrup while it bakes:
- In a saucepan, combine sugar, water, and lemon juice, bring it to a boil, then let it simmer gently for 8 to 10 minutes until it thickens slightly. Once off the heat, stir in orange blossom and rose water, then let it cool completely—you want to pour it over hot knafeh, not already-cooled pastry.
- The crucial invert:
- This is the moment that feels slightly nerve-wracking but always works: remove the knafeh from the oven, immediately run a knife around the edges to loosen it, then invert it onto a serving platter in one confident motion. Pour half the cooled syrup over the hot knafeh right away so it soaks in.
- Garnish and serve:
- Sprinkle chopped pistachios over the top and drizzle with honey if you like. Serve it warm, with extra syrup on the side for people to add as much as they want.
 Pin it
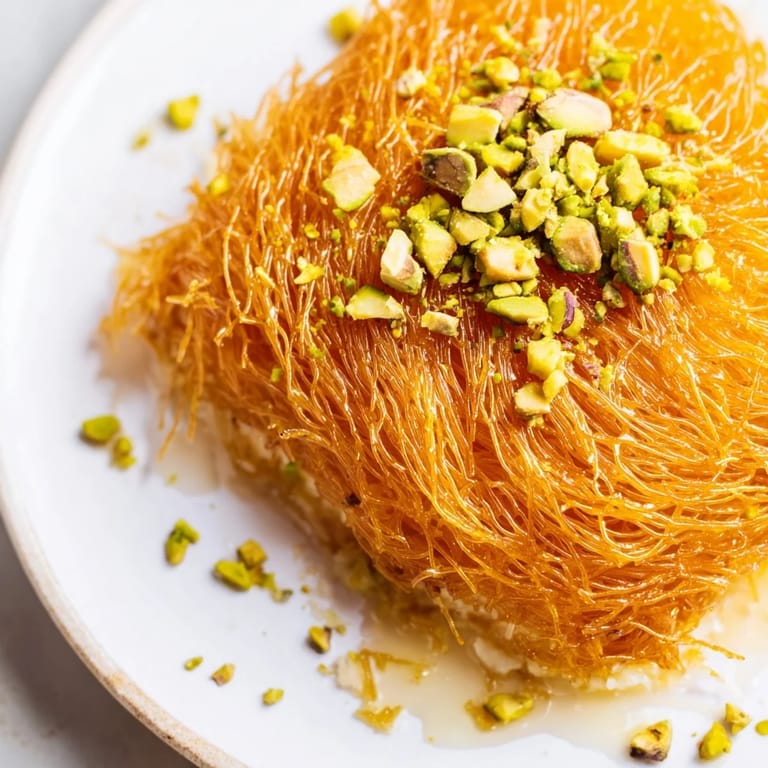
 There's something almost ceremonial about pulling knafeh out of the oven and watching it transform from a simple layered dish into something that looks like it belongs in a bakery window. The moment you pour that fragrant syrup over the warm pastry and see it glisten, you understand why this dessert has been celebrated for centuries.
The Cheese Question
Finding authentic Akawi cheese can be tricky depending on where you live, but it's worth seeking out in Middle Eastern or Mediterranean markets—the difference between it and mozzarella is subtle but real. That said, low-moisture mozzarella is a perfectly respectable substitute if Akawi isn't available; it won't taste identical, but it'll still melt beautifully and create those satisfying cheese pulls. I've made knafeh both ways, and while the Akawi version has a more complex flavor, the mozzarella version still impresses everyone at the table.
Texture and Timing Matter
The texture of knafeh is where all the appeal lives, and it depends entirely on timing and temperature. If you want an extra-crispy top, broil the knafeh for just 1 to 2 minutes after baking—watch it closely so it doesn't burn, but those extra moments of direct heat will make the pastry crackle even more satisfyingly. Serve it warm, never at room temperature, because the cheese will have already set and won't have that gorgeous stretchy quality anymore. The window for peak texture is about 20 to 30 minutes after it comes out of the oven, so plan your timing accordingly if you're making this for guests.
Pairing and Presentation
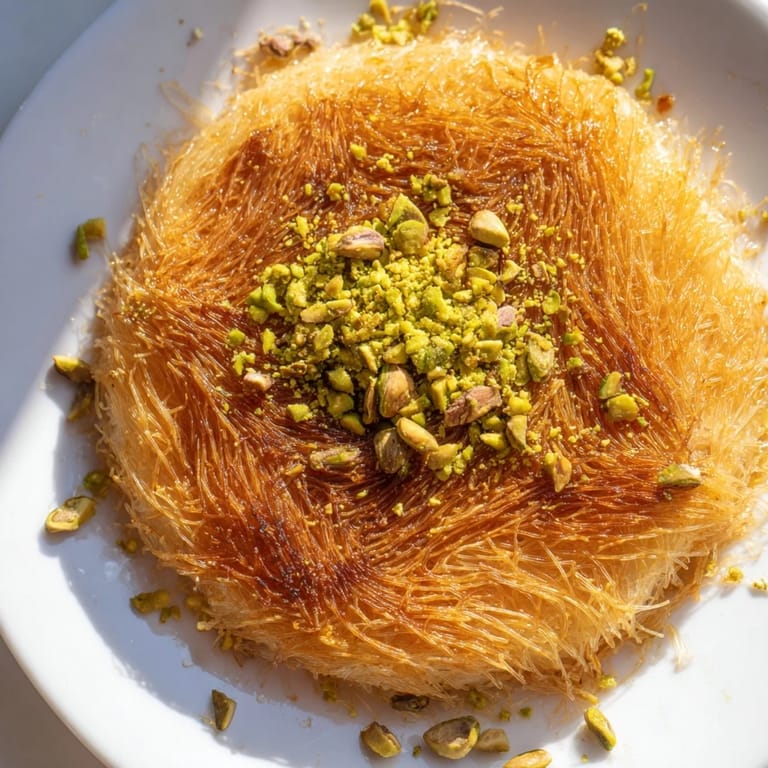
Knafeh deserves to be served with intention, whether that's alongside strong Turkish coffee that cuts through the sweetness or with mint tea that echoes the floral notes in the syrup. The visual presentation is part of the experience too—that golden-brown inverted knafeh on a white plate with green pistachios scattered across the top is already beautiful before anyone takes a bite.
- Offer extra syrup on the side so guests can control their sweetness level.
- A small fork or dessert spoon works best; this isn't finger food, despite how it looks.
- Let people know the cheese will be molten hot—it's absolutely worth waiting a minute before digging in.
 Pin it
 Knafeh is one of those desserts that feels fancy enough to celebrate with but approachable enough to make on a regular Tuesday night. Once you've made it once, the whole process becomes second nature, and you'll find yourself creating it for people you care about again and again.
Recipe FAQs
- → What cheese types are best for this dish?
Akawi cheese is traditional for its mild saltiness, but mozzarella and ricotta can be combined to create a stretchy, creamy filling.
- → How do you prepare the kataifi pastry?
Thawed kataifi strands are gently separated and mixed thoroughly with melted butter to ensure even crispiness when baked.
- → What is the purpose of soaking the cheese?
Soaking Akawi cheese helps remove excess salt and softens its texture, perfecting the balance of flavors in the filling.
- → How is the syrup flavored?
The syrup is simmered with sugar, lemon juice, then infused with fragrant orange blossom and rose water for a floral sweetness.
- → What garnishes complement this dish?
Chopped pistachios add a crunchy contrast, while a drizzle of honey enhances the aromatic syrup and overall sweetness.
- → Can this dish be made ahead of time?
For best texture and freshness, it’s recommended to serve immediately after preparation to maintain its crispiness.