 Pin it
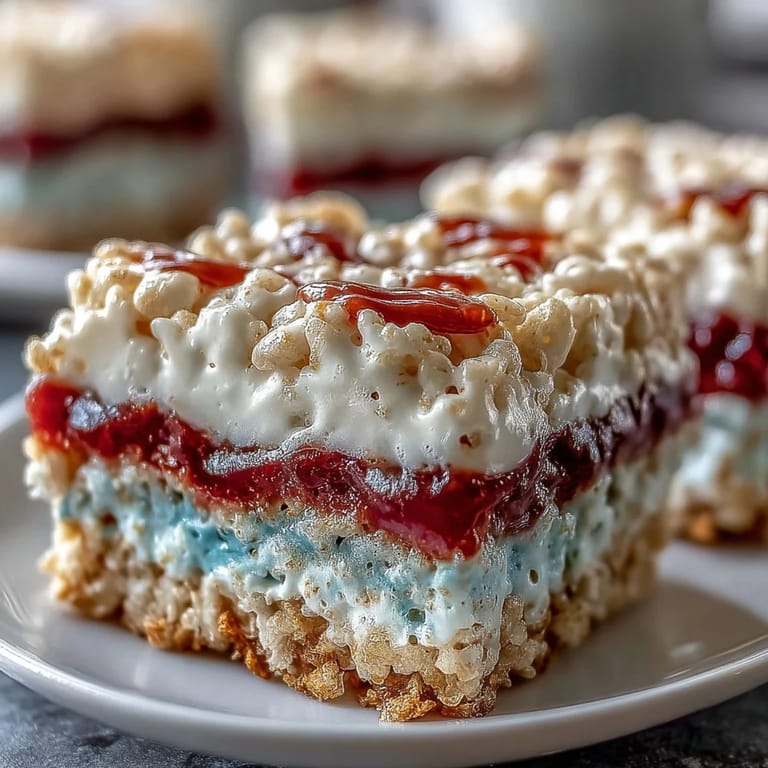
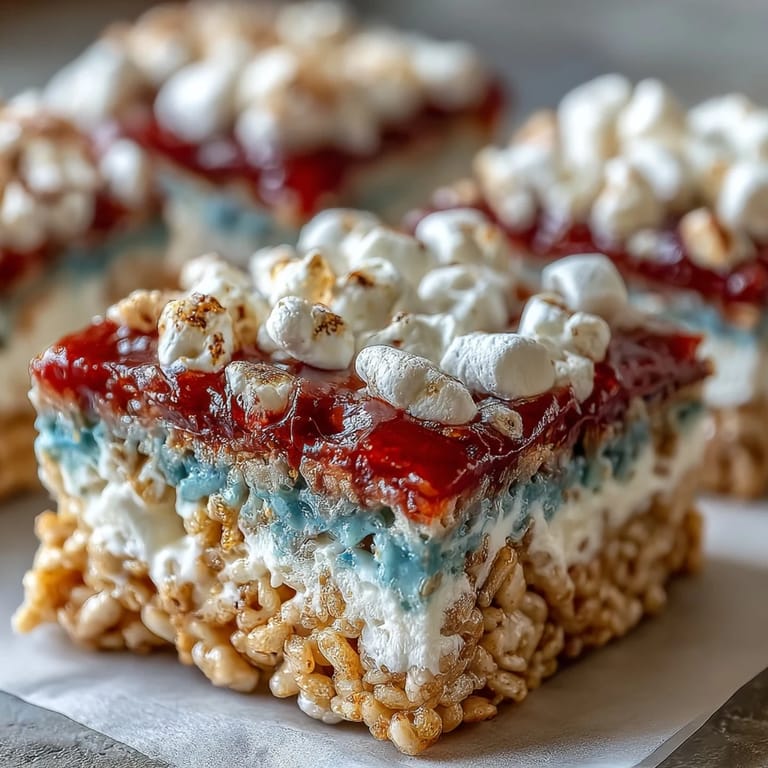
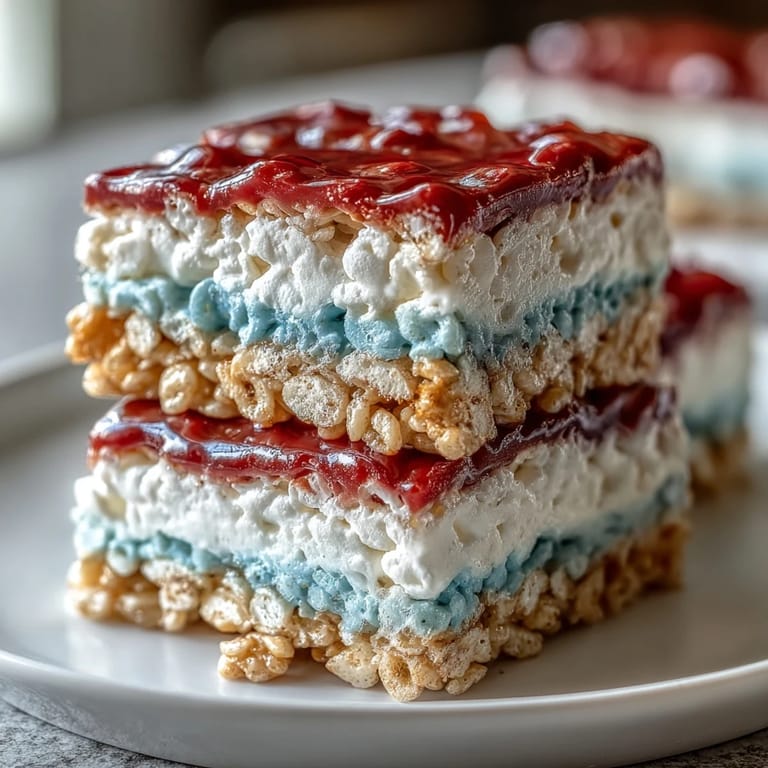
 My neighbor knocked on the door that Fourth of July morning with a half-finished batch of Rice Krispies treats and a frustrated expression. She'd tried layering them in patriotic colors but everything had swirled together into a murky brown mess. Watching her describe the kitchen chaos—marshmallow stuck to the ceiling, food coloring splattered across her apron—I realized the trick wasn't complicated, just methodical. Three separate batches, one clean pan between each, and patience while pressing each layer down firmly enough to hold but gently enough not to compress the crispness out of them. That afternoon, we made them together correctly, and by evening, those ruby red, cream white, and sapphire blue squares were stacked on every picnic table in our neighborhood.
I'll never forget my daughter's face when she saw the finished treats cooling on the counter—she literally gasped and asked if we could save one to show her teacher before eating it. That's when I realized these weren't just candy; they'd become the centerpiece of our July Fourth tradition, the thing people asked for by name when they heard we were bringing dessert. Every year now, we make them together while she argues about whether the blue should be deeper or brighter, and somehow that conversation matters more than the treats themselves.
Ingredients
- Rice Krispies cereal: You need six cups total, and it's worth measuring by volume rather than pouring straight from the box—too much makes the treats dense and hard to slice cleanly.
- Mini marshmallows: The ten-ounce bag is crucial; larger marshmallows don't melt as evenly and create chunky layers instead of the smooth, glossy finish you're after.
- Unsalted butter: Dividing the three tablespoons into three equal portions means each layer gets exactly one tablespoon, which keeps the mixture workable without becoming greasy.
- Vanilla extract: This goes only in the white layer, where it adds a subtle sweetness that balances the richness of the marshmallow.
- Gel food coloring: Gel is non-negotiable here—liquid coloring makes the mixture weep and slide around, while gel gives you those saturated, true colors that make the treats look patriotic rather than muddy.
- Red, white, and blue sprinkles: Optional but worth the effort; they add a festive texture and remind everyone exactly what you were celebrating when you made them.
Tired of Takeout? 🥡
Get 10 meals you can make faster than delivery arrives. Seriously.
One email. No spam. Unsubscribe anytime.
Instructions
- Prepare your pan:
- Line a nine-by-nine-inch baking pan with parchment paper so the edges hang over slightly, then lightly grease the paper itself—this makes lifting the finished treats out clean and painless. The parchment should feel slick but not wet; you're creating a non-stick surface, not a moisture barrier.
- Portion everything before you start:
- Divide your marshmallows and butter into three equal portions now, while everything's still cold and easy to count. This prevents the chaos of trying to eyeball thirds while you're standing over a hot saucepan with melting marshmallows.
- Make the red layer:
- Melt one tablespoon of butter over low heat—it should be melted but not foaming—then add your first portion of marshmallows and stir constantly until the mixture is completely smooth and glossy. Add just a few drops of red gel coloring at a time, stirring thoroughly between additions, because the color deepens as you mix; you're building toward the shade you want, not overshooting it.
- Add cereal and press:
- Stir in two cups of Rice Krispies quickly but gently, coating every piece in that marshmallow mixture, then immediately transfer it to your prepared pan and press it down firmly in an even layer using either lightly greased hands or the back of a spatula. The key is pressing hard enough that the layer holds together when you stack the next one on top, but not so hard that you squeeze out all the air and make it dense.
- Clean the pan between layers:
- Wipe your saucepan completely clean with a damp cloth before moving to the white layer—any red residue will tint the white layer pink, which defeats the patriotic point. This takes thirty seconds and makes all the difference in keeping your colors crisp and separated.
- Make the white layer:
- Melt the second tablespoon of butter over low heat, add the second portion of marshmallows, and stir until completely smooth, then add half a teaspoon of vanilla extract for a whisper of flavor. The vanilla is forgiving—too much becomes perfume-like, so stick to that half teaspoon measure.
- Stack and press the white:
- Mix in two more cups of Rice Krispies, then gently press this layer over the red one, using the same firm-but-careful pressure you used before. The word gentle matters here because you don't want to crush through the red layer underneath.
- Make the blue layer:
- Clean the pan one more time, melt your final tablespoon of butter, add the remaining marshmallows, and stir until smooth, then add blue gel coloring a few drops at a time until you reach that deep, patriotic blue. This final layer is your grand finale, so don't rush the coloring—it's worth taking an extra minute to get it right.
- Complete the stack:
- Stir in the last two cups of Rice Krispies, press the blue layer over the white layer with gentle firmness, and immediately sprinkle with red, white, and blue sprinkles if you're using them. The sprinkles stick best while the treats are still slightly warm, so don't wait.
- Cool completely:
- Let the treats sit undisturbed at room temperature for at least one hour—patience here is crucial because cutting into them too early will cause them to crumble and fall apart. You'll know they're ready when the top feels set and the pan has cooled enough to hold in your hands without heat.
- Cut and serve:
- Lift the entire slab out of the pan using the parchment overhang, place it on a cutting board, and slice into sixteen squares using a sharp knife dipped in water and wiped clean between cuts. Wet cuts prevent dragging and sticking, which keeps your layers intact and your presentation beautiful.
 Pin it
 The moment that made me understand these treats weren't just recipe success was when my son's friend came back for thirds and said they were the only thing that made him think of America as anything other than what he saw on the news. That one sentence changed how I thought about feeding people—it's never just about flavor or appearance; it's about creating a small, edible moment of unity. These treats became our Fourth of July love letter, one my family makes faithfully every single year.
The Science Behind the Layers
Understanding why these layers stay separate taught me something fundamental about cooking: temperature and timing matter as much as ingredients. When you let each layer cool slightly before adding the next one, you're creating a moisture barrier that prevents the dyes from bleeding into each other and the marshmallow from re-warming and bonding into one muddy mass. The vanilla in the white layer also serves a practical purpose—it adds a flavor anchor that makes your brain recognize three distinct treats rather than perceiving them as one cookie with stripes.
Making Them Your Own
The beauty of this recipe is how forgiving it is to personalization once you understand the basic technique. I've experimented with almond extract in the white layer for a subtle nod to amaretti, and once I even replaced the vanilla with a tiny pinch of peppermint extract for a holiday twist that nobody asked for but everyone loved. The coloring is similarly flexible—if you can't find gel food coloring, freeze dried fruit powders work beautifully if you mix them with a teaspoon of water first. The key is respecting the three-layer structure and the cooling time; everything else is negotiable.
Storage and Next-Day Magic
These treats actually improve slightly after a day or two in an airtight container at room temperature, when the marshmallow continues to set and the texture becomes less fragile and more chewy-centered. I've learned to make them a day ahead of my gatherings, which removes the pressure of having them perfect immediately and lets me focus on other parts of the meal. The airtight container is crucial though—left exposed, they'll start going stale after a few hours, and nobody wants a rubbery Rice Krispie treat, no matter how patriotic it looks.
- Keep them in an airtight container at room temperature for up to three days, and they'll stay soft and delicious.
- If they somehow last longer than that, you can revive them by sealing them with a slice of fresh bread overnight, which adds moisture back in.
- Don't refrigerate them unless you live somewhere extremely hot—cold makes the marshmallow brittle and changes the texture in an unhappy way.
 Pin it
 These treats have become my answer to the question of what makes a recipe worth repeating: it's never just about taste or technique, but about the moment it creates and the tradition it becomes. Make them once, and I promise your Fourth of July will never be quite the same.
Recipe FAQs
- → How do I achieve bright colors in the layers?
Use gel food coloring for vivid tones. Liquid coloring can make the mixture too wet and affect texture.
- → Can I prepare this treat ahead of time?
Yes, store in an airtight container for up to 3 days to maintain freshness and texture.
- → What is the best way to press the layers evenly?
Lightly grease your hands or a spatula to prevent sticking and press gently but firmly for uniform layers.
- → Are there any common allergens to watch for?
Contains milk from butter and possibly gluten depending on cereal choice; marshmallows may contain gelatin.
- → Can I add extra flavor to the treats?
Adding a pinch of salt or using salted butter can enhance the overall flavor profile.