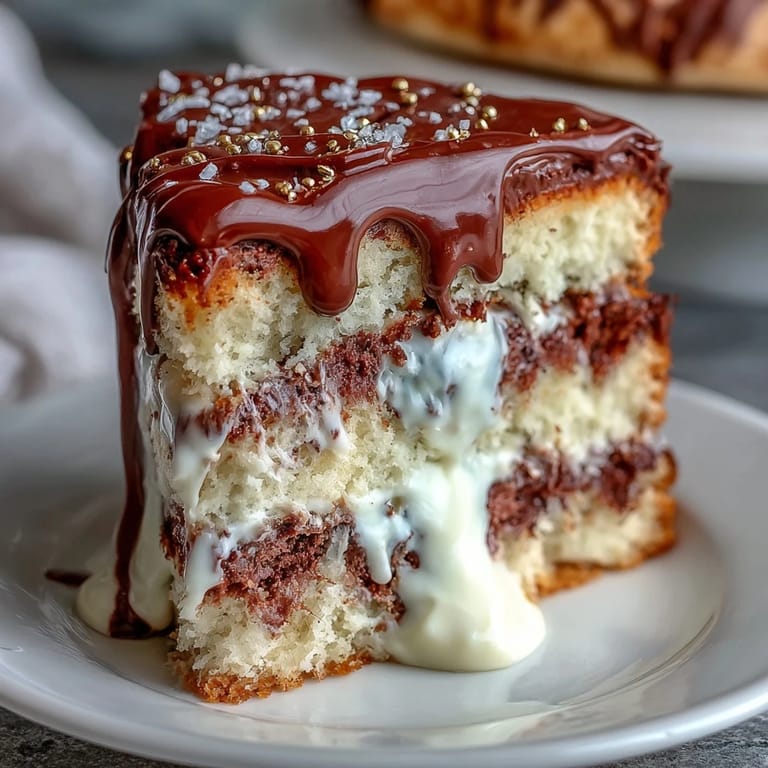
 Pin it
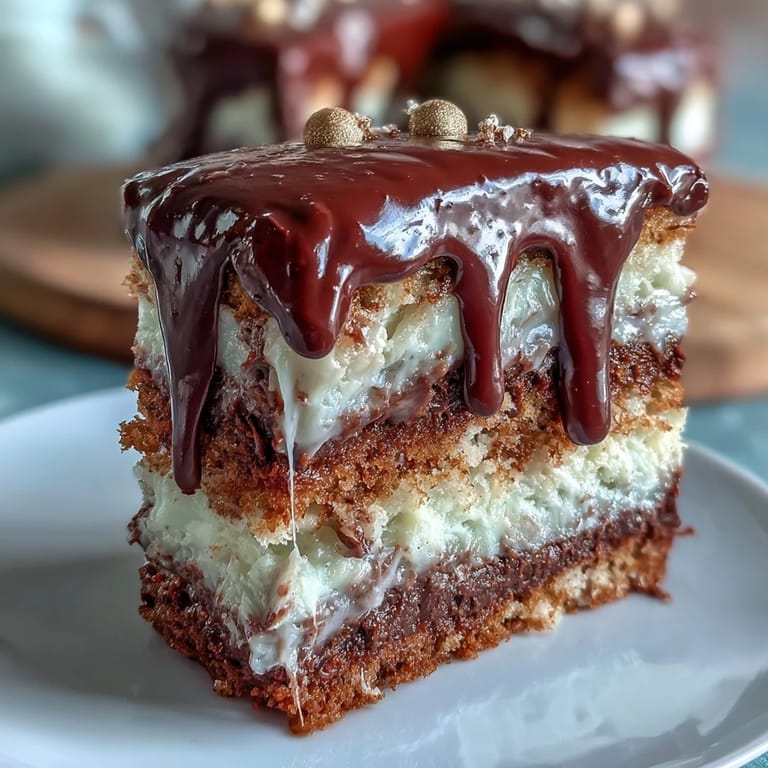
 My cousin texted me three weeks before her graduation with a single emoji—a cake—and I knew exactly what she wanted. I'd been experimenting with white chocolate ganache that spring, watching it cascade down practice cakes in my kitchen, and somehow I'd been waiting for the right moment to perfect it. When her graduation day arrived, I wanted her cake to feel like a celebration frozen in time, something that said yes, you did it without needing words. This vanilla sponge with its silky white chocolate buttercream and that dramatic drip became the answer.
I'll never forget frosting this cake in my friend's kitchen the night before the ceremony, both of us laughing as I tried to make the drip look casual when really I was concentrating harder than I ever had. Her roommate walked in halfway through, gasped at the white chocolate cascade, and suddenly it felt real—like all those practice batches had led to this exact moment. That's when I knew the cake wasn't just dessert; it was a marker, a edible memory of something worth celebrating.
Ingredients
- All-purpose flour (2½ cups): Sifting it twice keeps the crumb tender and prevents dense pockets, something I only learned after my first dense attempt.
- Baking powder (2½ tsp): Room temperature ingredients are non-negotiable here; cold eggs fight the leavening and create an uneven rise.
- Unsalted butter (1 cup, plus 1 cup more for buttercream): Let it sit out for a full hour—the creaming step literally creates air pockets that make the cake light.
- Granulated sugar (2 cups): This dissolves into the butter to create that signature fluffy texture that keeps the cake moist.
- Large eggs (4, room temperature): Cold eggs won't incorporate properly and you'll end up with a gummy crumb.
- Pure vanilla extract (1 tbsp, plus 1 tsp more): Use real vanilla, never imitation; the flavor difference is the difference between a nice cake and a memorable one.
- Whole milk (1 cup, room temperature): The fat content in whole milk contributes to that silky crumb structure.
- Powdered sugar (4 cups, sifted): Sifting removes lumps and aerates it, making your buttercream smooth instead of grainy.
- White chocolate (6 oz for buttercream, 6 oz for drip): Chop it finely so it melts evenly without seizing or becoming grainy.
- Heavy cream (2-3 tbsp plus ¼ cup for drip): The cream is what makes the ganache glossy and pourable; without it, you get a thick, dull coating.
- White chocolate crispy pearls or malt balls (1 cup): These become your edible gold balloons, providing texture and a whimsical touch.
- Edible gold spray or luster powder: A little goes a long way; one light coat looks elegant, while heavy spraying looks overdone.
Tired of Takeout? 🥡
Get 10 meals you can make faster than delivery arrives. Seriously.
One email. No spam. Unsubscribe anytime.
Instructions
- Prepare your pans:
- Preheat your oven to 350°F and get three 8-inch round pans lined with parchment paper—this step prevents sticking and makes release effortless. Greasing the pan first, then laying parchment, then greasing again is the obsessive-but-worth-it approach.
- Mix your dry ingredients:
- Whisk flour, baking powder, and salt in a medium bowl until they're evenly combined. This pre-mixing means you won't end up with pockets of unmixed baking powder that create bitter spots.
- Cream butter and sugar:
- Beat room temperature butter and sugar together for at least 3 minutes until the mixture is pale and noticeably fluffy—this is where your cake gets its tender crumb. Stop occasionally to scrape the sides; you want everything incorporated.
- Add eggs one at a time:
- Beat each egg in individually, waiting until the previous one is fully mixed before adding the next. This takes patience but prevents the mixture from separating or becoming dense.
- Add vanilla and alternate wet and dry:
- Pour in your vanilla, then on low speed, add flour mixture and milk alternately, starting and ending with flour. This prevents overworking the batter and keeps the crumb tender.
- Bake your layers:
- Divide batter evenly among pans and bake for 30 to 35 minutes until a toothpick comes out clean. The edges will pull slightly from the pan when they're done.
- Cool completely:
- Let cakes rest in pans for 10 minutes, then turn them out onto wire racks. Complete cooling is essential before frosting or your buttercream will melt.
- Make the buttercream:
- Beat softened butter until smooth, then gradually add sifted powdered sugar while mixing on low speed. Pour in your melted and cooled white chocolate along with vanilla, salt, and cream, beating until light and fluffy.
- Build and crumb coat:
- Level your cooled cakes if needed, place the first layer on your serving plate, and spread a thin layer of buttercream between each layer. Apply a thin crumb coat over the entire cake and chill for 30 minutes to seal in crumbs.
- Final frosting coat:
- Apply a thick, smooth layer of buttercream to sides and top, using an offset spatula to create an even surface. This is where your cake goes from good to gorgeous.
- Create the white chocolate drip:
- Heat heavy cream until it just begins to steam, pour it over finely chopped white chocolate, wait 1 minute, then stir until completely smooth. Let the ganache cool to room temperature before using so it has that perfect glossy, pourable consistency.
- Apply the drip:
- Using a spoon or squeeze bottle, let white chocolate ganache cascade around the top edge and down the sides of your cake. Fill the center with ganache and smooth it gently with a spatula.
- Create gold balloon decorations:
- Spray your white chocolate pearls or malt balls with edible gold spray (or roll them in luster powder) and let them dry completely. Insert toothpicks or thin cake wires and arrange them in a festive cluster on top of the cake.
- Chill and serve:
- Refrigerate the finished cake until ready to serve, then bring it to room temperature for at least 30 minutes before slicing. This allows the flavors to come through and the texture to be at its silkiest.
 Pin it
 Watching my cousin cut into that cake at her graduation party, seeing the vanilla crumb stack perfectly on the server, and then watching her face light up as the white chocolate buttercream melted on her tongue—that's the moment I understood why people bake for celebrations. This cake became more than dessert; it became the edible version of saying I believe in you, and honestly, there's no better way to mark a milestone than that.
The Vanilla Sponge Secret
The reason this sponge stays moist for days lies in the ratio of butter to flour and that crucial addition of whole milk. I discovered this somewhat by accident when I was testing cakes and noticed the ones made with milk stayed tender even on day three, while the ones made with less liquid dried out by day two. The milk adds fat and moisture without making the cake heavy, and when you cream the butter and sugar properly, you're literally aerating the batter with thousands of tiny air bubbles that keep the crumb light.
White Chocolate Buttercream Wisdom
White chocolate buttercream is surprisingly forgiving if you understand one thing: melted white chocolate needs to cool completely before beating into butter, or the heat will cause everything to separate into a greasy, broken mess. I learned this the hard way during my second attempt, when I got impatient and poured warm chocolate into softened butter, watched it immediately split, and had to start over. The cooling step takes 10 minutes and saves you from having to throw out half a batch. Also, white chocolate is more delicate than dark chocolate, so resist the urge to overmix once it's incorporated.
Gold Balloons and Celebration Details
The gold balloon decorations transform this cake from beautiful to unforgettable, but the magic is in the restraint. A light spray of edible gold looks elegant and sophisticated; a heavy coat looks more theme park than celebration. I've learned that sometimes less is more, and a few perfectly placed gold-dusted pearls on toothpicks look far more intentional than covering the entire top.
- Let the edible gold dry completely before inserting toothpicks, or the coating will rub off on your hands.
- Use thin cake wires instead of toothpicks if you're worried about poking holes in your frosting.
- Arrange the balloon cluster off to one side rather than dead center for a more dynamic, less formal look.
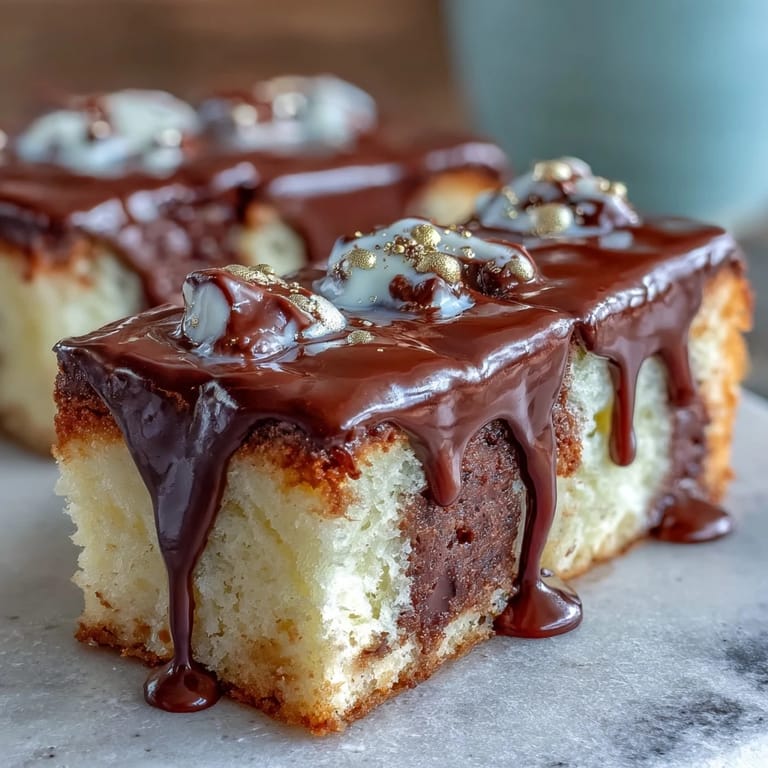
 Pin it
 This cake is proof that celebrations deserve beautiful things, and that the effort you put into a dessert is really effort you're putting into making someone feel seen and celebrated. Bake this for someone you want to remember, and you'll create a memory that tastes as good as it looks.
Recipe FAQs
- → What is the best way to achieve a smooth white chocolate drip?
Heat the cream until just simmering, then pour over chopped white chocolate. Let it sit for a minute before stirring until smooth and cooled to room temperature for easy dripping.
- → How do I keep the vanilla sponge moist?
Alternate adding the flour mixture and milk, beginning and ending with flour, and avoid overmixing. Baking for about 30–35 minutes ensures a tender crumb.
- → Can I prepare the cake decorations in advance?
Yes, decorate white chocolate crispy pearls with edible gold spray or luster powder ahead of time and let dry completely before arranging on the cake.
- → What tools are essential for assembling this cake?
An electric mixer, offset spatula, parchment paper, and a spoon or squeeze bottle for the drip are key for smooth preparation and decoration.
- → How should the cake be stored to maintain freshness?
Store the cake in the refrigerator for up to 3 days and bring it to room temperature before serving for best texture and flavor.