 Pin it
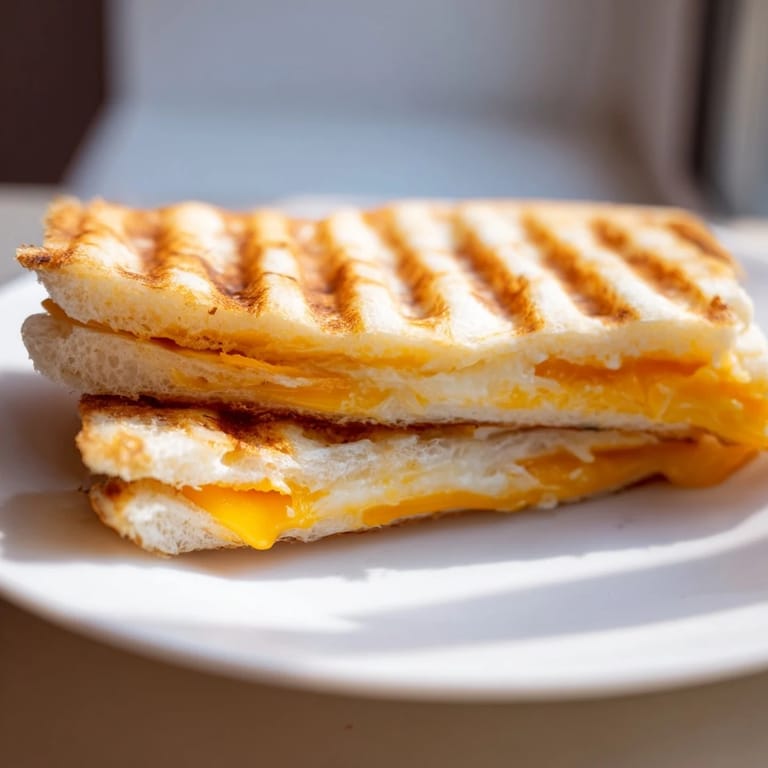
 The first time I made a grilled cheese in a waffle maker, I was standing in my kitchen on a lazy Sunday afternoon, staring at leftover bread and a hunk of cheddar, when it hit me—what if I just pressed this into the waffle maker sitting on my counter? Five minutes later, I pulled out something with golden, crispy ridges and cheese bubbling in all the right places, and I haven't looked back since. It sounds silly, but that accident became one of my go-to meals when I want something that feels more special than a regular sandwich but still takes practically no time.
I made this for my roommate on a Wednesday when she came home stressed about work, and watching her face light up when she bit into those crispy, warm squares reminded me that sometimes the simplest meals do the most comforting. She texted me the next day asking if I could make it again, and now it's become our unofficial 'bad day' remedy.
Ingredients
- Sandwich bread (white, whole wheat, or sourdough): Four slices give you enough for two satisfying sandwiches, and the bread type matters—sourdough gets extra crispy, while white bread melts more forgivingly if you're nervous.
- Cheddar cheese (or Gruyère, mozzarella, Swiss): Use whatever melts beautifully in your kitchen; I've learned that two slices per sandwich is the sweet spot between gooey and structurally sound.
- Unsalted butter, softened: Two tablespoons total, softened so it spreads easily without tearing your bread—cold butter is the enemy here.
- Tomato slices (optional): If you add them, pat them dry first or your sandwich gets soggy, which I learned the hard way.
- Cooked bacon (optional): Two slices add a smoky richness that makes people ask for your recipe.
- Dijon mustard (optional): One teaspoon adds a subtle tang that brightens everything without overpowering the cheese.
Tired of Takeout? 🥡
Get 10 meals you can make faster than delivery arrives. Seriously.
One email. No spam. Unsubscribe anytime.
Instructions
- Fire up your waffle maker:
- Turn it on and let it preheat according to the manufacturer's instructions—this usually takes two to three minutes. You'll know it's ready when the indicator light stops blinking or a little chime goes off.
- Butter your bread:
- Spread a thin, even layer of softened butter on one side of each of your four bread slices. Don't be stingy, but don't drown them either; the butter is what creates those golden, crispy ridges in the waffle maker.
- Build your sandwiches:
- Lay two slices of bread buttered-side down on a cutting board, add two slices of cheese to each one, and pile on any optional add-ins you're using. Top each with another slice of bread, buttered-side up, so the buttered sides face outward—this is the secret to even browning.
- Press and watch closely:
- Place one sandwich into the waffle maker, close the lid gently, and press lightly without forcing it. Cook for three to five minutes, checking after three minutes—bread thickness and waffle maker temperament vary, and you want golden brown, not burnt.
- Repeat and rest:
- Remove the first sandwich with a fork (it'll be hot), let it sit for about a minute so the cheese sets slightly, then do the same with the second sandwich. Slice diagonally or straight across, depending on your mood, and serve immediately.
 Pin it
 There's something genuinely magical about serving this to someone who's never had a waffle-pressed grilled cheese before—their eyes go wide, they take that first bite, and suddenly they're hooked. It's proof that the best food doesn't need complicated technique or fancy ingredients, just a little creativity and maybe a willingness to try something unexpected.
Elevating Your Grilled Cheese
Once you've made the basic version a few times, you'll start seeing possibilities everywhere. I've pressed bacon and cheddar with caramelized onions, tried gruyère with fig jam on sourdough, and even done a breakfast version with cheddar and scrambled eggs smashed inside. The waffle maker doesn't care—it just crisps and melts whatever you put in it, which is exactly why this became my go-to canvas for experimentation.
Serving and Pairing
A bowl of tomato soup is the obvious partner, and it's perfect—dunk and savor. But I've also paired it with pickled vegetables for brightness, a simple arugula salad with lemon vinaigrette when I want something lighter, and even just a side of cornichons when I'm keeping it minimal. The crispy-on-the-outside, melty-on-the-inside nature of this sandwich plays well with almost anything acidic or fresh, which gives you freedom to work with what you have.
Kitchen Tricks and Timing
The waffle maker is honestly one of the most underutilized kitchen tools, and once you realize you can press a grilled cheese into it, you start imagining what else might work. I've pressed hash browns, leftover pizza, and even deli sandwiches. The key is always the same: butter the outside, don't overstuff the inside, and watch the first batch to learn your machine's personality. Every waffle maker is a little different, and it's worth spending those first five minutes getting to know yours.
- If your sandwiches are browning too fast, reduce the heat if your waffle maker allows it, or open the lid a few seconds earlier next time.
- Make the filling slightly less full than you'd think necessary—the waffle maker will compress it, and overstuffed sandwiches are harder to press and can leak.
- Preheat your plate or serving board with hot water, then dry it, so your sandwich stays hot longer from the moment it arrives at the table.
 Pin it
 This is one of those recipes that proves comfort food doesn't have to be complicated—just a little unexpected. Make it once, and it becomes part of your regular rotation.
Recipe FAQs
- → What kind of bread works best?
Use sandwich bread like white, whole wheat, or sourdough for crispiness and structure when pressed in the waffle maker.
- → Can I use different cheeses?
Absolutely. Try melting cheeses such as Gruyère, mozzarella, or Swiss for varied flavor and texture.
- → How does the waffle maker affect cooking?
The waffle maker presses and crisps the bread uniquely, creating golden ridges that enhance crunch and appearance.
- → Are there options for add-ins?
Optional layers like tomato slices, cooked bacon, or a smear of Dijon mustard add complexity and variety to each bite.
- → What cooking time is recommended?
Cook sandwiches for about 3–5 minutes until the bread is golden and cheese is fully melted.